Install PHP-FPM on Ubuntu and Debian
Install PHP-FPM on Ubuntu and Debian
What is PHP-FPM? That’s probably some of you are thinking, or maybe someone of you found this page by looking how to install it, anyway, FPM stands for Fastcgi Process Manager. This is a much better alternative to PHP Fastcgi, can be used on any sites, but mostly used with busier sites where owners want to make best use of their server resources. It will speed your website as PHP-FPM is faster than the legacy PHP Fastcgi while keeping resources as low as possible and not only that, you have a lot of control over the PHP processes compared to normal PHP Fastcgi module. Anyway, in this tutorial I’m going to show you how to install PHP-FPM on Ubuntu and debian operating systems.
Preparing repositories
With PHP-FPM you are required to have some repositories, first for PHP extensions and then also for FPM. I currently use the Doteb repository for Debian and Ubuntu, I’m going to use them this time also, so add the below lines to your /etc/apt/sources.list
|
1 2 |
deb http://packages.dotdeb.org wheezy all deb-src http://packages.dotdeb.org wheezy all |
Don’t forget the Doteb key for using this repository:
|
1 2 |
wget http://www.dotdeb.org/dotdeb.gpg apt-key add dotdeb.gpg |
You will also need one other repository for the apache fastcgi module, unfortunately this is in the non-free archive area. Add the line below to your /etc/apt/sources.list
|
1 |
deb http://ftp.de.debian.org/debian wheezy main non-free |
Next don’t forget to update the package list, it is necessary on Debian / Ubuntu:
|
1 |
apt-get update |
Install php, php extensions and FPM
Next step here is to install php and all php extensions needed for our website scripts. Use below command to install these:
|
1 |
apt-get install php5 php5-mysql php5-curl php5-gd php5-idn php-pear php5-imagick php5-imap php5-mcrypt php5-memcache php5-mhash php5-ming php5-ps php5-pspell php5-recode php5-snmp php5-sqlite php5-tidy php5-xmlrpc php5-xsl php5-json |
Once we finished to install PHP and all the PHP extensions needed, we can start installing PHP-FPM
|
1 |
apt-get install php5-fpm |
Once we’ve completed this step, we proceed with installing the FastCGI module for apache2.
Install mod_fastcgi on Ubuntu and debian
For this you only need to run at this point the command below:
|
1 2 |
apt-get install libapache2-mod-fastcgi a2enmod actions |
The apache module will be installed and enabled and you should be ready to go. I’ve added the actions module to be enabled as we will need this at the end.
Configuring PHP-FPM with mod_fastcgi
This step is the tricky part, in all my setups I’ve used I’ve set PHP-FPM to listen on a specific port on all my IP address, well you can specify what ever IP address you wish or if you want it to listen on a unix socket, but that’s more or less of a preference. In my case I’ll go with it listening on a specific port. Open the file:
/etc/php5/fpm/pool.d/www.conf
This is the default pool for our FPM processes, keep in mind that FPM works with pools, you can create a number of pools for different websites, while having different settings and all that. Well you would change the listen line to the default port 9000 like below:
|
1 |
listen = 9000 |
Once you’ve completed this, restart the php5-fpm service:
|
1 |
/etc/init.d/php5-fpm restart |
The last part now is to have mod_fastcgi connect to our php5-fpm service, we do this by creating the file:
/etc/apache2/conf.d/mod_fastcgi.conf
and adding the contents below:
|
1 2 3 4 5 6 7 8 9 10 11 12 13 14 |
<IfModule mod_fastcgi.c> FastCGIExternalServer /usr/sbin/php5-fpm -host 127.0.0.1:9000 AddHandler php5-fastcgi .php Action php5-fastcgi /usr/sbin/php5-fpm.fcgi ScriptAlias /usr/sbin/php5-fpm.fcgi /usr/sbin/php5-fpm <Directory /usr/sbin> Options ExecCGI FollowSymLinks SetHandler fastcgi-script Order allow,deny Allow from all </Directory </IfModule> |
Save the file and restart apache:
|
1 |
/etc/init.d/apache2 restart |
The end result will be spotted if you create a simple phpinfo() page, see bellow image:
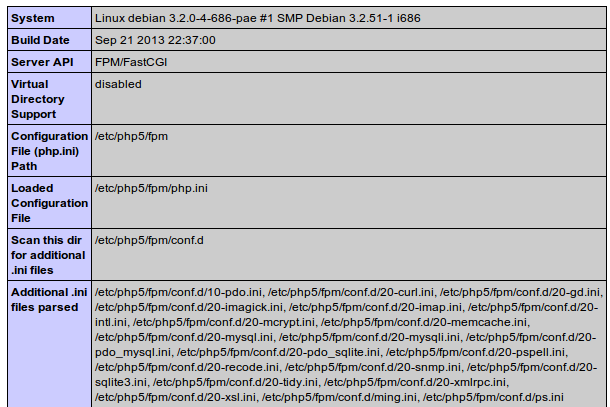
phpinfo php5-fpm
That’s it for today, thanks for reading and will see you again in our next tutorial!


